This whole-cloth art quilt is made of hand-dyed cotton fabric, embroidered by hand with perle cotton thread. It reflects my sometimes dark, always shifting journey through the early months of the COVID pandemic in 2020-21.
31″h x 21″w
NFS

This whole-cloth art quilt is made of hand-dyed cotton fabric, embroidered by hand with perle cotton thread. It reflects my sometimes dark, always shifting journey through the early months of the COVID pandemic in 2020-21.
31″h x 21″w
NFS

We had a snow day today, so I used the unexpected bonus time and bonus snow to do some snow-dyeing.

Step 1: soak cotton fabric in soda-ash solution, crumple up and place on drainage rack in plastic tub.

Step 2: cover with several inches of fresh snow
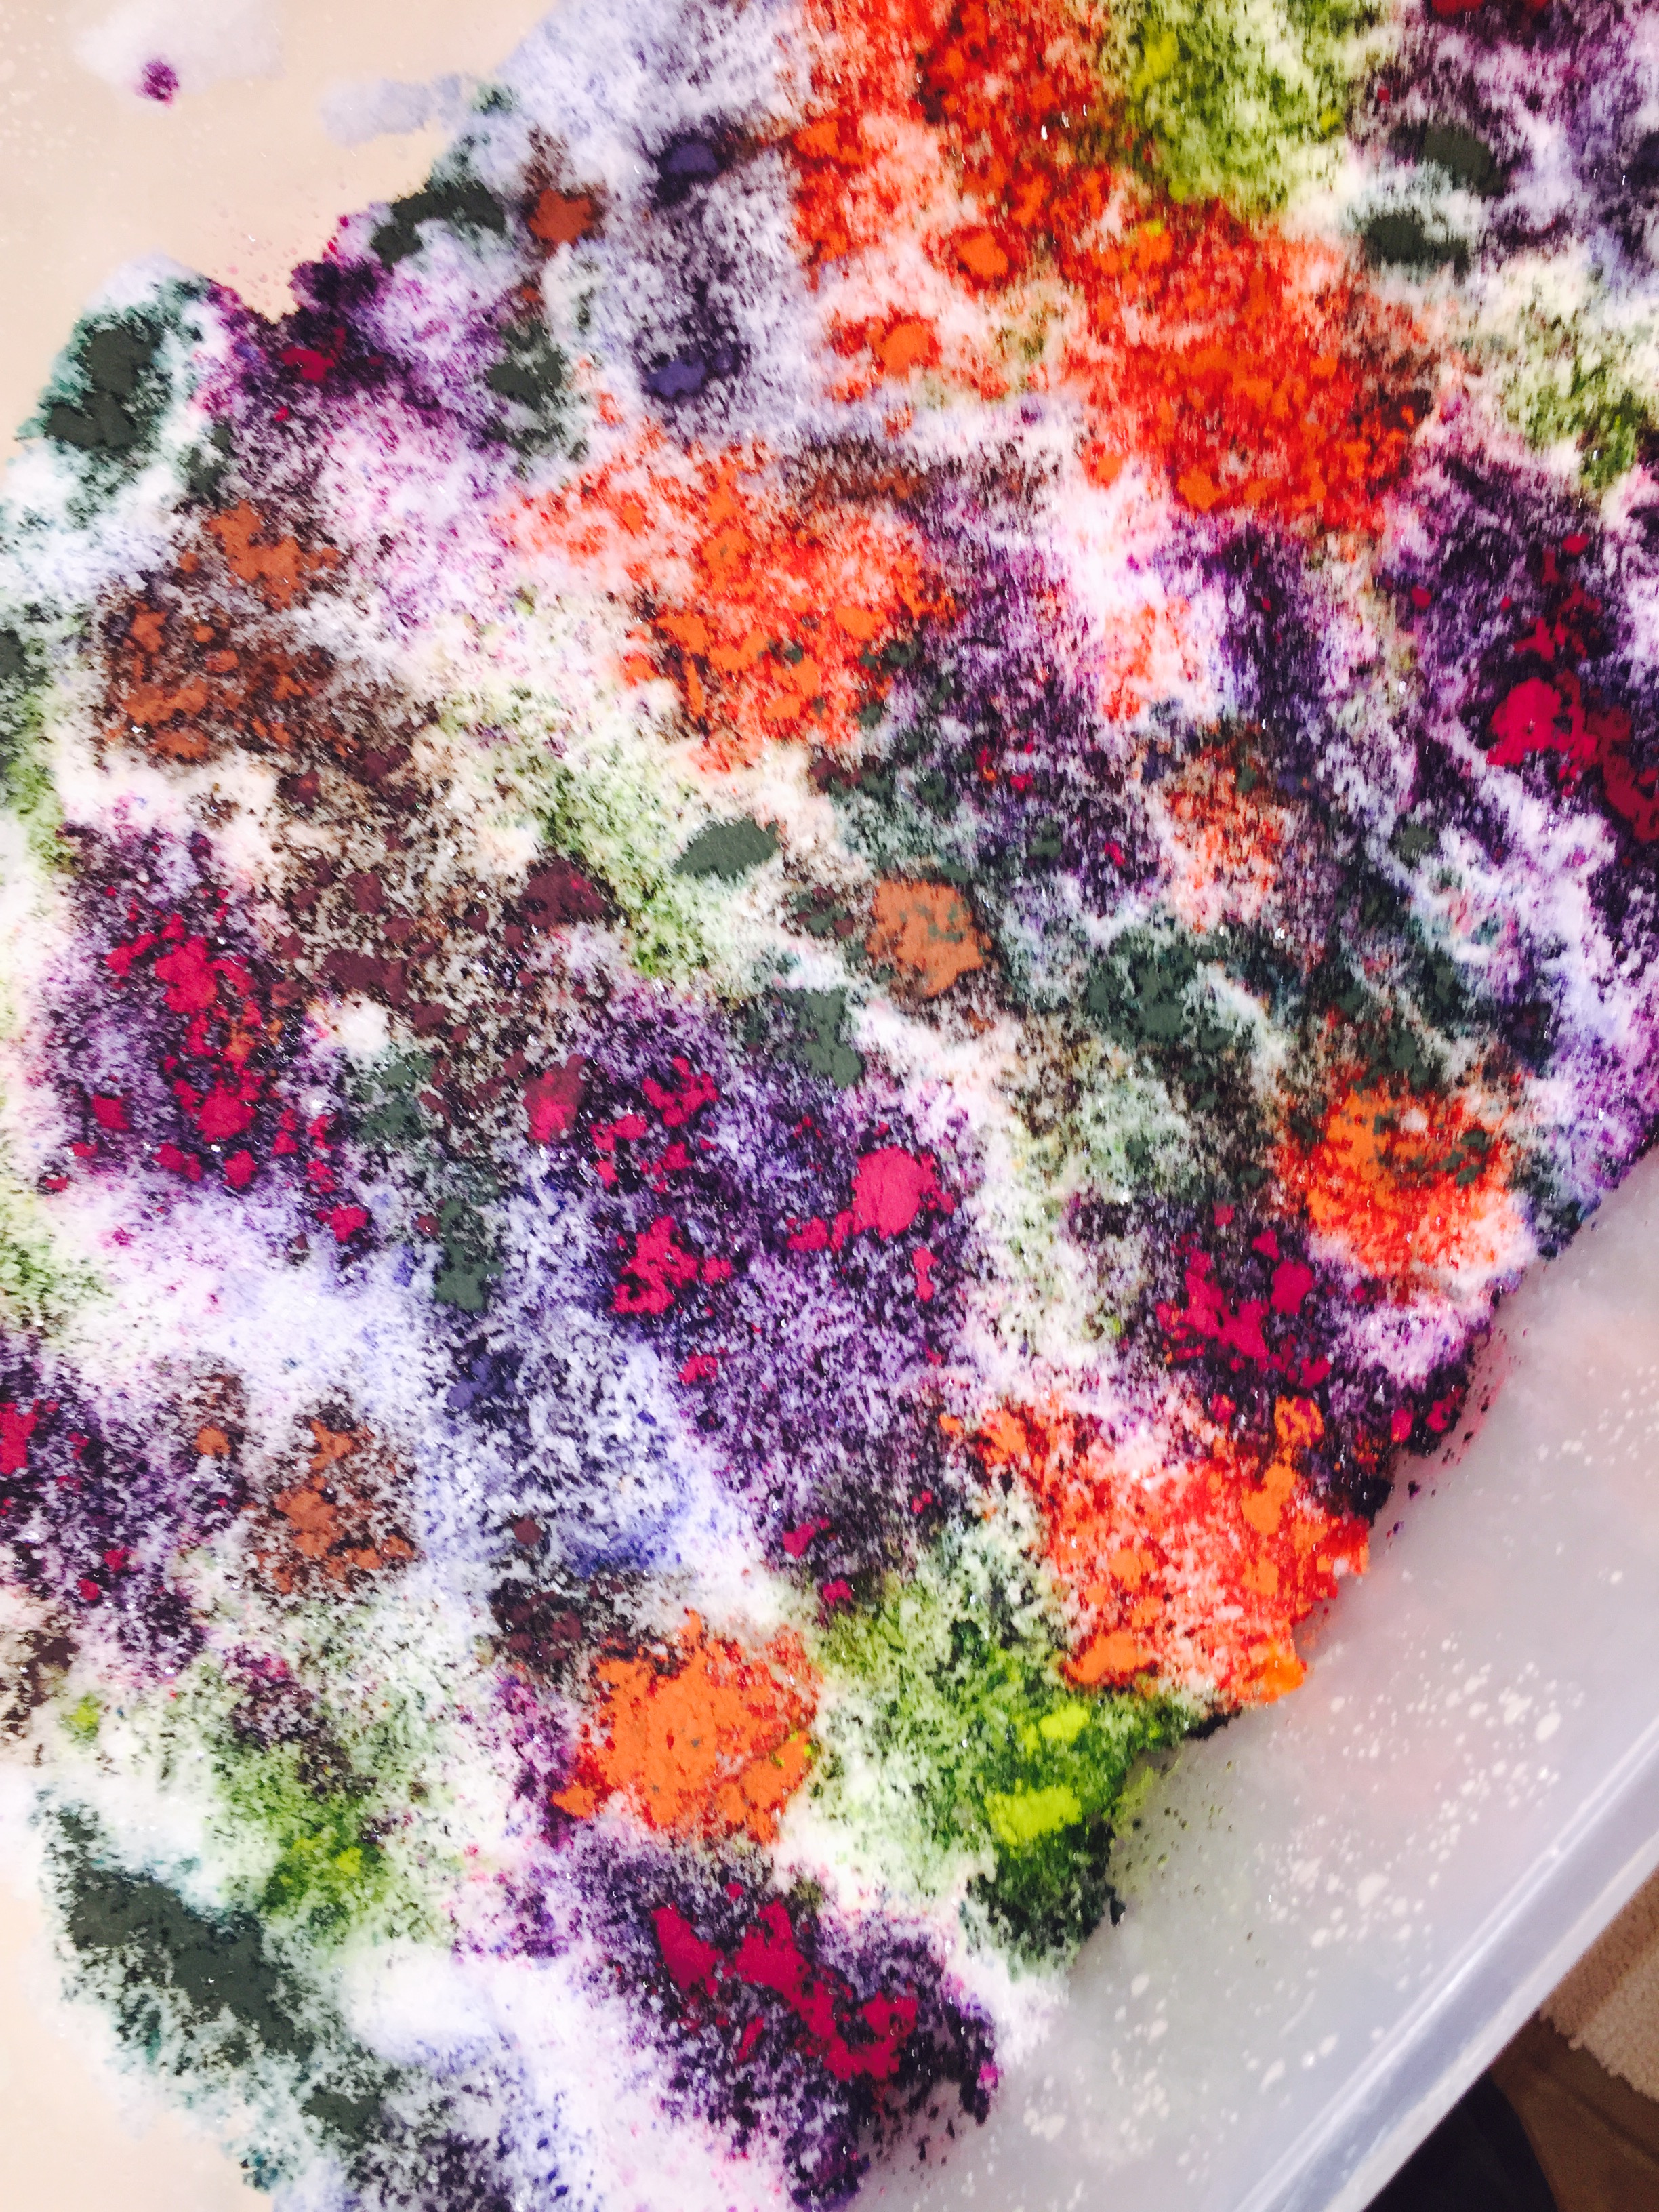
Step 3: sprinkle fiber-reactive dye powder on snow. I use Procion MX.
Step 4: Cover and wait 24 hours.

Step 5: uncover and be amazed. Rinse in cold water until water runs clear. Wash with synthrapol and dry.

Step 6: press and be even more amazed.


I got to play with silk dyes this week! So much fun now that I have a proper frame for stretching my silk. Hubby built me a simple frame out of 1×4’s with a 14″ x 72″ opening. I tack damp silk in the opening, and I have a perfectly stretched canvas for silk painting.

silk scarf pinned to frame
First, I used a favorite serti-resist method, with Elmer’s washable school glue. I drew lines and shapes with the glue directly onto the silk.
silk scarf with glue resist
After the glue was dry, I painted the spaces within the glue lines with Jacquard Green Label silk dyes. I love these dyes because they can be mixed and lightened with the addition of water.
I also like the way they react to rock salt and rubbing alcohol to add texture to the surface.
After letting the dye dry for 24 hours, I set the dye by steaming the scarf. I don’t have any special apparatus for this. I roll the scarf in blank newsprint and place it on a rack in my canning kettle above boiling water for 30 minutes.
The glue can be rinsed out of the silk with a mild detergent (I use Woolite) and some mild scrubbing with an old soft toothbrush. It helps to let the scarf soak before scrubbing.
glue-serti dyed silk scarf
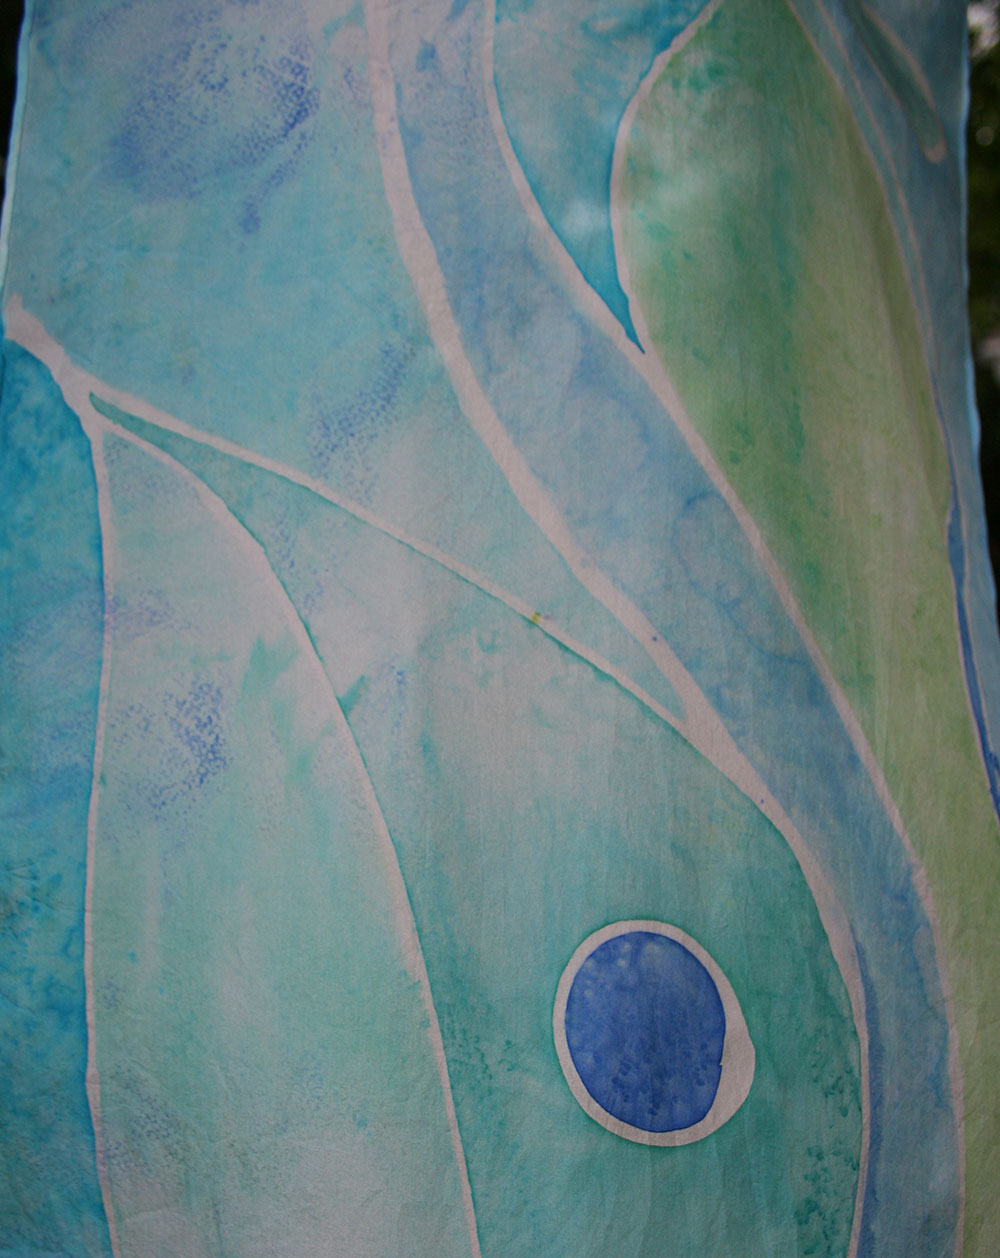
Loving my new frame and too impatient to wait for glue to dry again, I dyed the next couple of scarves without a resist.

These scarves were painted without a resist
For this one, I painted arcs of varying shades of blue and green. Then I sprinkled rock salt over the wet dye to pull the dye and form the interesting concentrations of dye.

Freehand painting, with rock salt effects
For this scarf, I relied on rubbing alcohol to help disperse the dye and form rings. For each ring, I dropped a 50% alcohol/water mix onto the silk, and then painted a circle around the drop. This kept the dye from filling in the circle. I covered the silk with circles in this manner and them the dye dry completely before adding another layer, then another, then another.
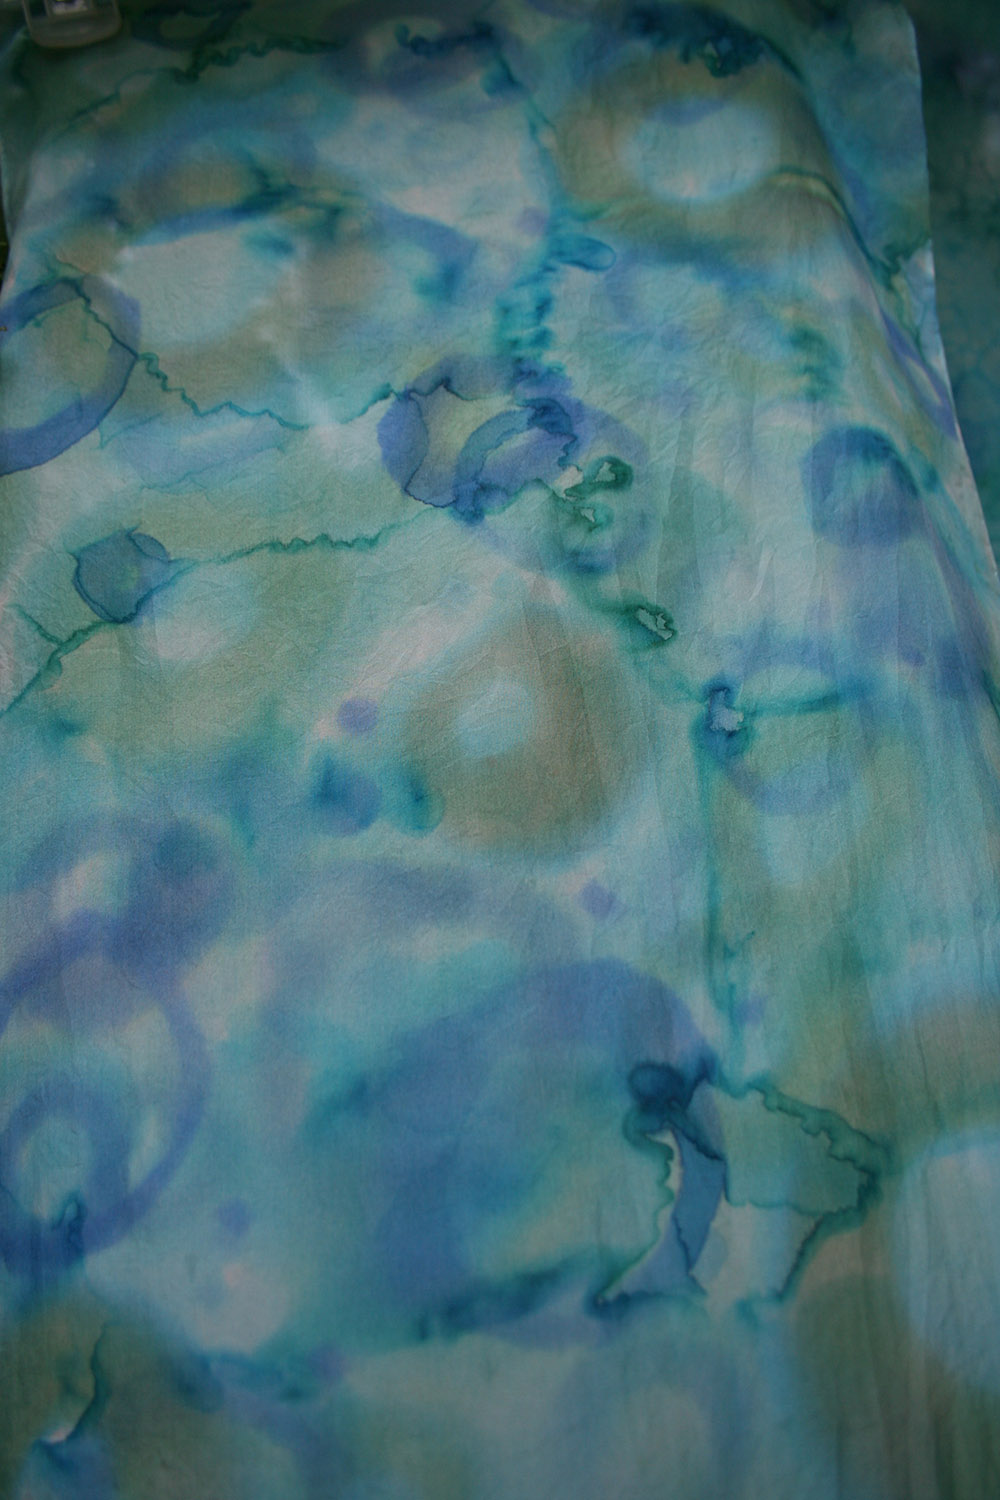
Freehand painting, with rubbing alcohol effects
So many beautiful scarves, so few days to wear them!
(noun \ˈhwȯr(-ə)l, ˈwȯr(-ə)l, ˈ(h)wər(-ə)l\) something that whirls, coils, or spirals or whose form suggests such movement.
This small art quilt started as an exploration of texture. As many of my pieces, it was prompted by a monthly challenge from my Art Quilt Group.
I first hand-dyed a length of fine china silk, then started tucking and gathering with matching thread. I didn’t have any plan for the final outcome; it evolved organically into the nautilus shape. The silk was backed by a double layer of cotton batting, then embellished with glass beads and my favorite variegated silk embroidery floss. Finally, I finished the edges in the naturally irregular shape it had become, and mounted it on a crisp-cornered pillowcase-finished eggplant Kona cotton base.
Bonus! See this piece, three others of mine, and many other fine works by my Art Quilt Group at the June 2016 Art Hop at Ninth Wave Studio in Kalamazoo. June 3, 2016 5pm-8pm.
A late winter storm closed down the college where I work today. I took advantage of the free time by mixing up a vat of indigo and dyeing a length of china silk using the arashi shibori method. I think it will become a lovely scarf!


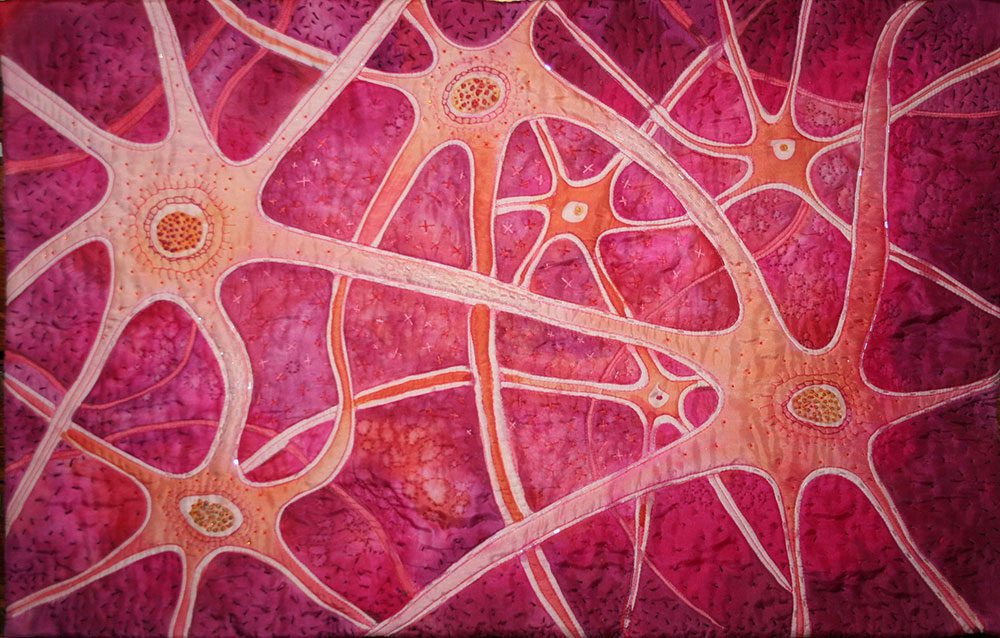
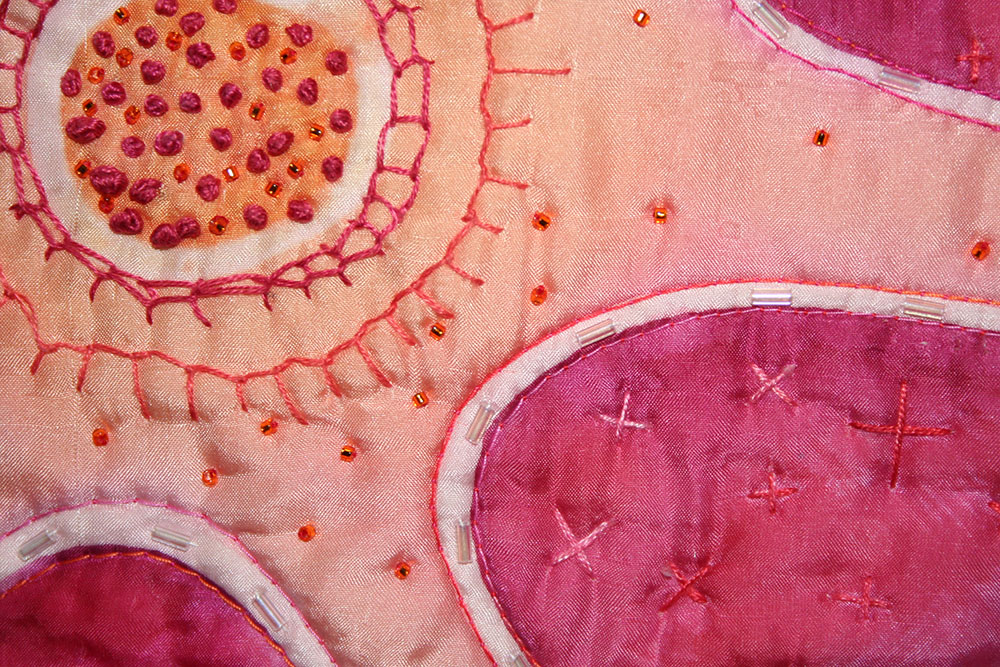
“Synapse” 20″x30″ hand-painted silk, hand embroidered and beaded.
“Synapse” detail
The challenge was to create an art quilt depicting “connections.”
My response is entitled “Synapse.”
This is a wholecloth quilt. I used Jaquard Green Label silk dyes with the serti resist method to paint this 20″ by 30″ piece of china silk. I machine quilted along the cell walls and dendrites. I embellished by hand with silk floss and glass beads.

“Synapse” detail
The brain has trillions of synapses.
At synapses, neurons release neurotransmitters that are picked up by their neighbors, carrying signals from cell to cell. These signals form memories and thoughts. The long, branchlike projections of brain cells are called axons and dendrites. These projections carry synaptic messages, integrating all the information a cell receives.
Intelligence is dictated by a brain’s underlying organization and molecular activity at its synapses.
Damage to dendrites is associated with depression and despair.
Alzheimer’s disease disrupts both the way electrical charges travel within cells and the activity of neurotransmitters between cells.
The Guatemalan legend has it, that these small colorful handmade dolls will take away the worries of the child who places th em under her pillow.
I fell in love with these 2 inch tall dolls on a recent trip to Central America, and brought home a couple dozen of them with the intention of challenging my art quilt group, and myself, to use one or two of them in an art quilt.
I wondered, “What do the worry dolls do with the worry they collect? What do they do when they have their own worries?” Maybe only other worry dolls could take all this away. And so I arrived at this infinite cycle — each doll a pillow for the next.
I wanted to present my extension of the myth with the color and style of the cloth that comprised the dolls’ dresses. I had no handwoven Guatemalan cloth (why didn’t I bring some of that home from C.A.?) So I mimicked it with running stitches embroidered with colorful perl cotton on black cotton duck.

“When Dolls Worry”,© Carolyn Zinn 2015. 17″x17″ cotton duck, perl cotton floss, imported dolls.


My father-in-law’s favorite wingback chair
My husband and I recently inherited a family heirloom. My father-in-law, who passed away in September, had a favorite chair that had seen better days. This is the story of its loving rejuvenation.
Like me, Warren was a gardener. Before he retired, he taught high school agriculture, horticulture and floriculture for many years. He was so proud of me when I obtained my certification as an MSU Extension Master Gardener five years ago.
I wanted to honor this bond by reupholstering his chair with a gardening theme. Combined with my current fascination with text fabric, the idea for a gardening phrase upholstery fabric was born.
I gathered 22 favorite quotes, downloaded some gorgeous script fonts, and set to work with Photoshop.

The fabric I designed with gardening phrases – click to enlarge.
I saved the file as a high resolution jpeg and had the fine folks at Spoonflower print up eight yards on heavy cotton twill. I can’t say enough about the fast, friendly service at Spoonflower! I think they had skeptics like me in mind with their inexpensive swatch option and even a 171-color hex-coded chart to assure me that my beige background would indeed turn out beige.
I’ve done re-upholstery before, so I had all the tools and, probably most importantly, the required audacity. But as I wasn’t sure there wasn’t some trick for wingbacks, I consulted the internet. Found this great series on YouTube by M J Amsden Furniture.
Believe me:
The removed pieces will serve as patterns for cutting your new fabric, and your careful notes can be used in reverse order when you are ready to start building back up.
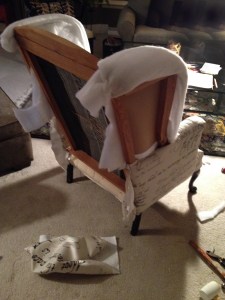
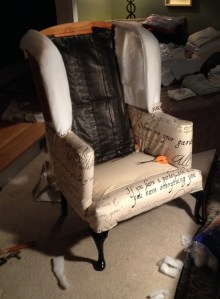
Hundreds of staples later (not to mention yards of batting and plenty of malbec),
I couldn’t be happier with the results. I like to think Warren’s angel settles there once in a while, to warm himself by the fire and look out upon my garden.
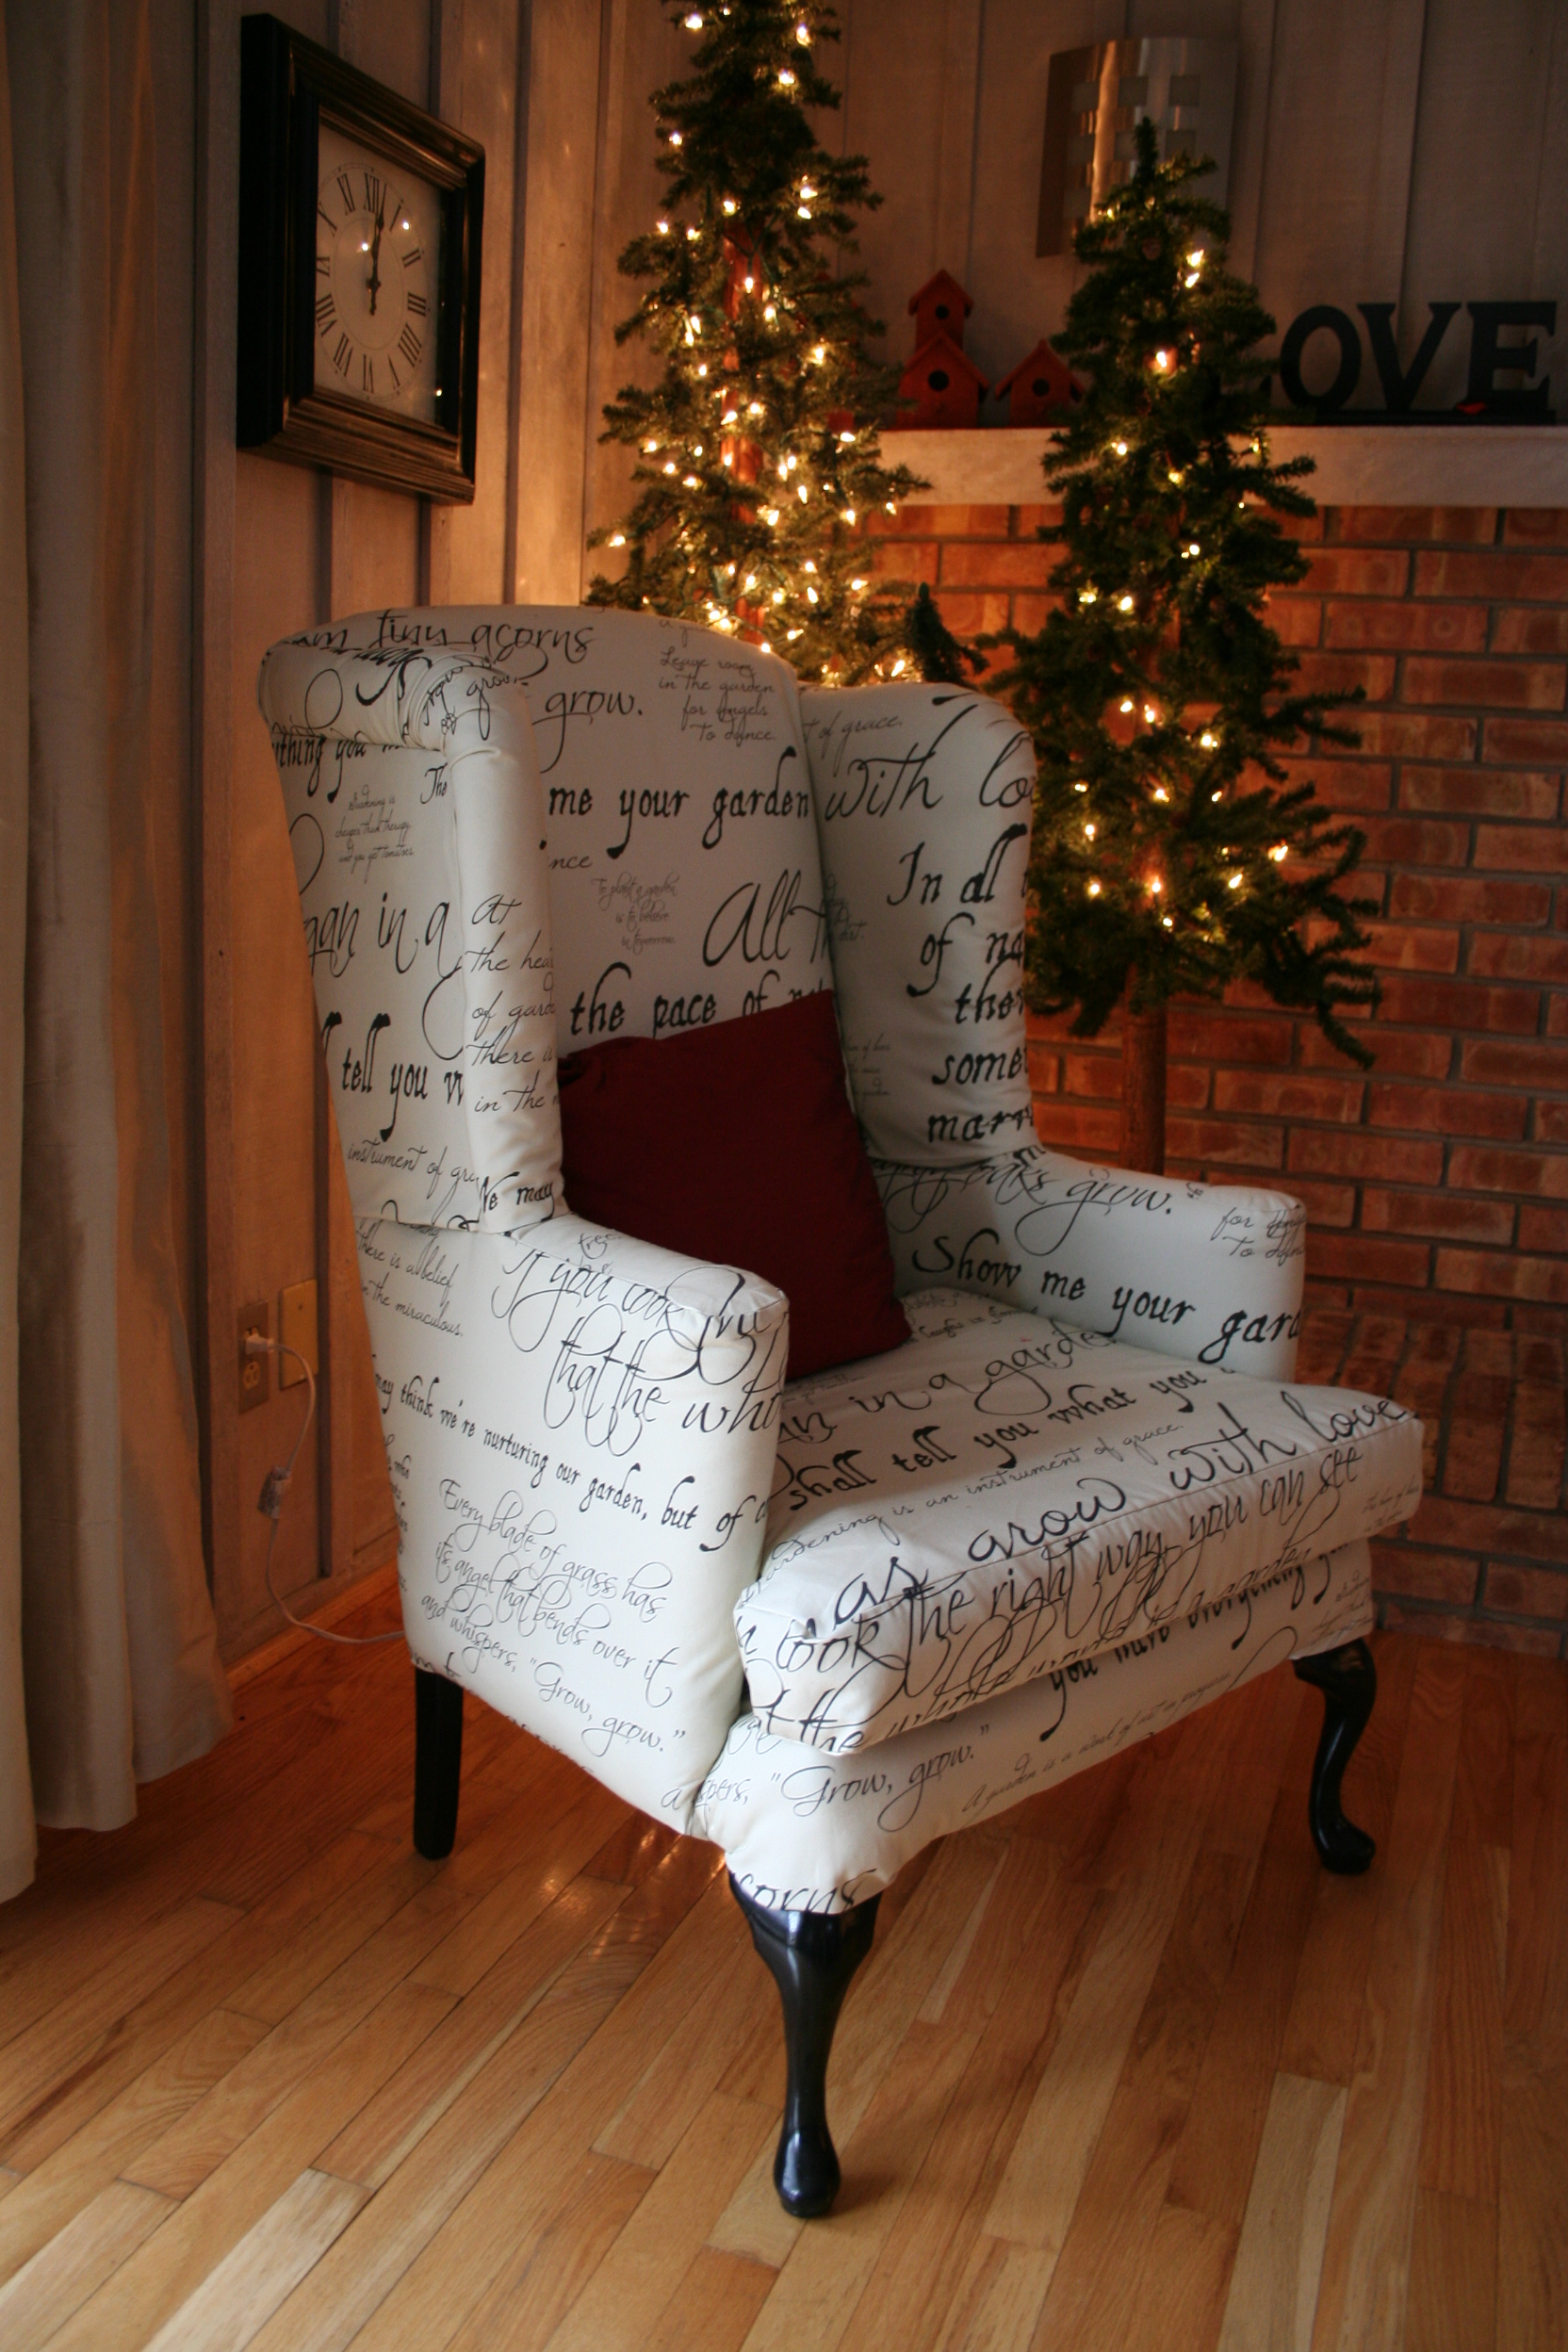
The finished chair
P.S. If you like the fabric I designed, it’s available for purchase on Spoonflower at http://www.spoonflower.com/fabric/3576030
I recently learned the Nui and Arashi Shibori techniques of resist dying. I loved the resist patterns and fell in love with magical indigo dye!

Drawing concentric semi-circles on folded edge of white Kona cotton

Stitching along the pencil lines with strong thread. We used doubled hand-quilting thread.

Gathering each row of stitching as tightly as possible without breaking the thread

Checking the “flower” on the indigo. Notice the greenish color – that means it is still active!

Submerging the piece for 2-3 minutes, moving constantly. Notice the green color!

Gorgeous results!

A second technique, “Wind-driven rain” Arashi Shibori. “Arashi” is the Japanese word for storm. The cotton is sewn into a tube that *just* fits over a pvc pipe. The fabric is scrunched tightly before submerging in the dye bath.

The fabric has just been taken off the pipe. The oxidation that turns the green to blue is still in process. The most beautiful green blues appear and disappear before your eyes. Magic!

Results of Wind-Driven Rain Shibori in indigo

Itajime Shibori: Flag-folded and dyed in indigo

More Nui Shibori, using stitched circles on multiple folds

